Elvis Robot Hacking
Elvis robot hacking? With Servos?


Elvis robot hacking? With Servos? It CAN be done. And it's really not that hard. Hacking Elvis with servos is possible if you know how and use the right RC servos. The problem with hacking Wowwee's Alive Elvis, is that it does not use standard RC servos. It uses two multi-h-bridge boards coupled with two multi-A-to-D converters.
The h-bridge board is simple enough, but the A-to-D board requires real programming. And then there is the task of controlling each and every servo's action based on the position of each servo's potentiometer. OUCH! That's a LOT OF WORK! And getting it to look right is even harder.
Elvis' head uses 8 servo motors for 8 degrees of freedom: Eyes up/down (1), eyes left/right (2), blink left(3), blink right(4) (Yup, your hacked Elvis can now BLINK which is something the original never did.)Jaw open/closed (5), and head left/Right(6), eyebrows up/down(7), and finally lip twitch up/down(8).
Elvis Robot Hacking with Servos: Materials
The list below shows you what you will need. (This is just for his head motors. Head tilt will be explained at a later date.)
- 8 Hitec 311 (or better) RC servo motors
- 1 EZ Robot microcontroller
- Solder iron/ solder
- Shrink tubing
- Labels
- Wire ties
WARNING: ONLY TO BE DONE BY SKILLED ADULTS
Hacking Elvis will require soldering skills, and the use of a sharp knife. Hacking your Elvis will of course void any warantee.
Hacking puts the person doing the hacking into potential danger which includes, cuts, burns, shocks, and in severe cases: DEATH! This author has been cut and burned several times during his hacking. (He has fortunately not suffered from death from hacking--yet.)
Steps for Elvis Robot Hacking
Get ready for a bit of work. The process will take between 4 and 20 hours depending upon how much experience you have in electronics.
BE CAREFUL! GO SLOWLY!
It is easy to damage your Elvis. It's easy to HURT YOURSELF!
1. Opening up your Elvis
To open your Elvis you will need to gently separate the hair (it's kind of a net/wig) from the back skull. You can easily pry it loose with a strong fingernail or a dull knife. Don't separate it from the rubber mask. Only separate it from the hard plastic back skull.
Next you need to take out the 5 screws that hold the back skull on.
Next you need to gently separate the back of the rubber mask from the back plastic skull. This is done by first cutting along the back of the ears.
Next remove the 4 screws that are holding the wire cover that is holding the wires that are coming out of the back of the skull.
Next remove the two cross bars and wire cover.
KEEP YOUR FINGERS OUT OF THE WAY OR YOU WILL DRAW BLOOD! ALWAYS CUT AWAY FROM YOU AND OTHER PEOPLE!
Then the sides of the back skull are cut loose. Finally the top of the back skull is cut loose. Although the mask is strong, a good pull will rip it and an uncontrolled knife will cut it.
At this point the back skull can be removed.
(More Elvis Robot Hacking)
2. Removing Boards and Wires You Won't Need
Unplug all of the wires. Remove the 5 electronic boards from inside the head. There are 4 screws holding each board in.
The top most board will be a bit difficult because the screws are a bit hidden.
Do NOT remove anything else. Getting it all back together properly requires that it stay together now.
(More to come.)
3. Removing the Control Boards from Your 8 Servos
Remove the 4 screws from the back of each Hitec 311 servo.
Remove the back of the servo and you will see the green servo control board.
Remove the solder from where the motor is attached to the servo control board.
Gently pull the board out. If it is not completely free, apply a bit more heat and remove it.
DO NOT PULL HARD! You can easily break the board in two if you pull hard.
Cut the three wires (red, yellow, green) leaving the wires longer on the board side.
Strip the leads about 1/4 inch on each wire on each board.
Put each board aside for later. You will need 8 boards.
Elvis Robot Hacking : Click HERE to go to Wowwee
4. Installing the RC Boards into Elvis
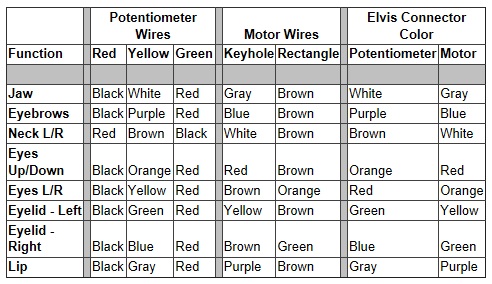
Cut the connector off of every Elvis motor (one connector with two wires) and every potentiometer(one connector with three wires.)
Connect each of the 5 wires to each R/C servo board as per the table below. The group of two wires controls the motor. The group of three wires is used to determine the position of the motor.
Below is a table showing the connections you need to make for each of the eight servo motors.
Using an RC servo motor tester, set the tester to the central position.
(Supply it with 6 volts DC at about 1 amp.)
Plug in a servo motor board into the servo tester.
Turn on your servo motor tester.
Turn the control left to right and watch the robot's movement. Be careful not to turn the control past the motor's limits. If you turn the control too far in either direction YOU WILL DAMAGE YOUR ELVIS.
5. Using the EZ-B Robot Board and System to Control Your Elvis
The EZ robot board (EZ-B) makes it easy to run your Elvis. It also makes it easy to control him with voice commands. The EZ-B allows you to use pre-recorded Elvis words or songs, or use a computer generated voice.
(This article is to be continued.)